Building a Mid-Range Gaming PC in 2025: Best Bang for Your Buck
I’ve been building PCs for over fifteen years. I’ve wasted money on parts I didn’t need, skimped on parts I shouldn’t have, and fried a motherboard by forgetting a standoff screw. Every mistake taught me something, and now I’m going to save you from making those same mistakes. If you’re looking to build a mid-range gaming PC in 2025 that punches well above its price tag, you’re in the right place.
This PC build guide targets a budget of $1,000 to $1,200 — the sweet spot where you get genuinely impressive gaming performance without lighting your wallet on fire. We’re talking smooth 1080p at max settings, very capable 1440p in most titles, and a machine that won’t need a major overhaul for at least three to four years. Let me walk you through every component, explain my picks, and share the practical tips I wish someone had told me when I started.
Why 2025 Is a Great Year to Build a Gaming PC
Honestly, the mid-range market hasn’t been this competitive in a long time. AMD and Intel are fighting tooth and nail at the sub-$300 CPU tier, DDR5 RAM prices have finally come down to earth, and 2TB NVMe SSDs cost less than a nice dinner. The GPU market has settled after the crypto-mining chaos of previous years, and you can actually buy a graphics card at MSRP. If you’ve been waiting for the right moment to build, this is it.
The Complete Parts List: Jiminy’s Mid-Range Gaming PC Build 2025
Before I dive into the reasoning behind each pick, here’s the full build at a glance. Every price listed is approximate based on current November 2025 street pricing.
| Component | Jiminy’s Pick | Alternative | Approx. Price |
|---|---|---|---|
| CPU | AMD Ryzen 7 7700X | Intel Core i5-14600K | $220 |
| GPU | NVIDIA RTX 4060 Ti 8GB | AMD RX 7700 XT | $350 |
| Motherboard | MSI MAG B650 TOMAHAWK WiFi | ASUS TUF Gaming B650-PLUS WiFi | $160 |
| RAM | 32GB DDR5-6000 CL30 (2x16GB) | 32GB DDR5-5600 CL36 | $85 |
| SSD | WD Black SN770 2TB NVMe | Samsung 990 EVO 2TB | $110 |
| PSU | Corsair RM750e (750W, 80+ Gold) | Thermaltake Toughpower GF3 750W | $90 |
| Case | Fractal Design Pop Air | NZXT H5 Flow | $80 |
| CPU Cooler | Thermalright Peerless Assassin 120 SE | DeepCool AK400 | $35 |
| Estimated Total | ~$1,130 | ||
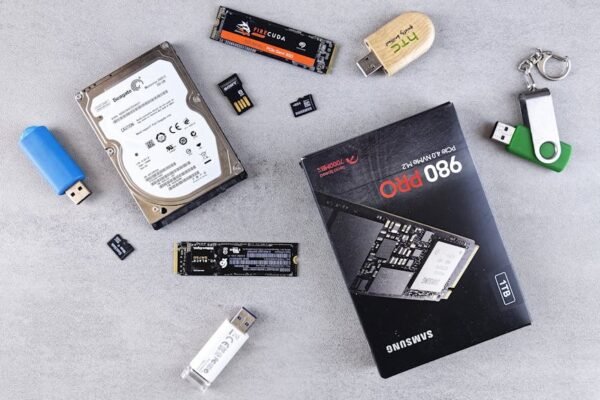
That leaves you some room within the $1,200 ceiling for a Windows license, extra fans (see our SSD vs NVMe vs HDD guide), or a bump to a slightly beefier GPU if you catch a sale. Now let’s break each component down.
CPU: AMD Ryzen 7 7700X vs Intel Core i5-14600K
This is where every build conversation starts, and where every internet argument begins. Let me cut through the noise: at this price point in November 2025, both the Ryzen 7 7700X and the i5-14600K are outstanding choices. You genuinely cannot go wrong with either.
I’m going with the Ryzen 7 7700X as my primary pick for a few reasons:
- Power efficiency: The 7700X draws noticeably less power under load than the 14600K, which means less heat and a quieter system.
- Platform longevity: AM5 is AMD’s socket going forward. You’ll have a clear upgrade path to next-gen Ryzen chips without changing your motherboard.
- DDR5-6000 sweet spot: Ryzen 7000 series loves DDR5-6000 with the Infinity Fabric running at a 1:1 ratio. You get a measurable performance uplift just by hitting that speed.
- Gaming performance: In the titles that matter most — the ones you’re actually playing in 2025 — the 7700X trades blows with the 14600K frame for frame.
The i5-14600K is a great alternative if you already own a compatible Intel motherboard, need the slightly stronger multi-threaded performance for streaming or content creation, or simply prefer Team Blue. No judgment from me — it’s a killer chip.
GPU: The Heart of Your Gaming PC Build
This is the component that will have the single biggest impact on your gaming experience, and it’s where I spent the most time deliberating. At the $300-$400 tier in 2025, you’re looking at three main contenders for the best gaming PC parts:
NVIDIA RTX 4060 Ti 8GB (~$350) — My Pick
The RTX 4060 Ti is my choice for this build, and here’s why: DLSS 3 with Frame Generation is a legitimate game-changer. In supported titles, you’re getting 40-60% more frames essentially for free, and the visual quality is excellent. The 4060 Ti handles 1080p at ultra settings with ease in virtually every game on the market, and it’s a very capable 1440p card in most titles when you lean on DLSS.
NVIDIA’s ray tracing implementation is also meaningfully ahead of AMD’s at this tier. If you care about RT effects — and in 2025, with more games supporting them well, you probably should — the 4060 Ti is the card to get.
AMD RX 7700 XT (~$340) — Strong Alternative
The RX 7700 XT is the rasterization king at this price. In raw performance without upscaling, it often edges out the 4060 Ti, especially at 1440p where its 12GB of VRAM gives it more breathing room. If you play a lot of titles that don’t support DLSS, or if you’re philosophically opposed to relying on upscaling tech, the 7700 XT is the better pure-GPU pick.
AMD’s FSR 3 has improved significantly, but it’s still a step behind DLSS 3 in image quality. That gap is narrowing, but it’s there.
NVIDIA RTX 4060 (~$280) — Budget Fallback
If you need to shave $70 off the build, the standard RTX 4060 is still a solid 1080p card. You lose roughly 15-20% performance compared to the Ti variant, but you keep all the DLSS 3 goodness. I’d only go this route if you’re strictly a 1080p gamer or if budget is genuinely tight.
RAM: DDR5 Has Finally Grown Up
Remember when DDR5 was absurdly overpriced and offered minimal real-world gains? Those days are gone. A 32GB DDR5-6000 CL30 kit runs about $85 in November 2025, and it’s the perfect pairing for our Ryzen 7 build.
Why 32GB? Because 16GB is increasingly cutting it close in 2025. Several modern titles now recommend 32GB, and having that headroom means you can comfortably game with a browser, Discord, and Spotify running in the background without worrying about page file thrashing.
Why DDR5-6000 specifically? As I mentioned, this is the sweet spot for Ryzen 7000. The Infinity Fabric clock matches the memory controller at this speed, giving you optimal latency. Going faster than 6000 doesn’t help much and can actually hurt if the IF has to run at a lower ratio.
Motherboard: MSI MAG B650 TOMAHAWK WiFi
I know the motherboard isn’t the glamorous pick, but cutting corners here is a mistake I’ve seen too many first-time builders make. The MSI MAG B650 TOMAHAWK WiFi at around $160 gives you:
- Rock-solid VRM design that won’t throttle even an overclocked 7700X
- Built-in WiFi 6E and Bluetooth 5.2
- Two M.2 slots for NVMe drives
- USB-C header for front-panel connectivity
- Excellent BIOS with easy XMP/EXPO memory profile support
The ASUS TUF Gaming B650-PLUS WiFi is a comparable alternative at a similar price. Both boards are well-built and reliable. Avoid the absolute cheapest B650 boards — they often have weaker VRMs and fewer connectivity options that you’ll miss later.
Storage: 2TB NVMe SSD Is the New Standard
The WD Black SN770 2TB at ~$110 is almost absurdly good value. Modern games are massive — we’re talking 100-200GB installs for AAA titles — and a 1TB drive fills up uncomfortably fast. The SN770 delivers read speeds around 5,150 MB/s and write speeds around 4,900 MB/s, which is plenty fast for gaming and general use.
If you want to spend a bit more for the Samsung 990 EVO or 990 Pro, go for it, but in real-world gaming load times, you won’t notice the difference. Save that money for a better GPU or a nicer case instead.
Power Supply: Don’t Cheap Out Here
I cannot stress this enough: the PSU is not where you save money. A bad power supply can take every other component with it when it fails, and cheap PSUs have higher ripple, worse voltage regulation, and shorter lifespans. The Corsair RM750e is 80+ Gold certified, fully modular, uses quality Japanese capacitors, and comes with a 7-year warranty.
750W is more than sufficient for this build — the total system draw under full gaming load will be around 350-400W. The extra headroom gives you upgrade flexibility and keeps the fan from spinning up under typical loads, which means a quieter system.
Case: Fractal Design Pop Air
The Fractal Design Pop Air at around $80 is my favorite mid-range case right now. It has excellent airflow with a mesh front panel, comes with two pre-installed 140mm fans, has a clean interior layout that makes cable management straightforward, and looks understated but sharp. It fits full ATX motherboards and GPUs up to 405mm long, so you won’t have clearance issues.
If you prefer a more minimalist aesthetic, the NZXT H5 Flow is a solid alternative at a similar price, though I give the edge to the Fractal for pure airflow performance.
CPU Cooler: Thermalright Peerless Assassin 120 SE
This tower cooler punches so far above its $35 price tag that it’s almost embarrassing for the competition. The Thermalright Peerless Assassin 120 SE handles the 7700X with ease, keeping it cool and quiet even under sustained loads. It’s a dual-tower design with two 120mm fans, and its thermal performance rivals coolers costing two to three times as much.
Unless you’re doing serious overclocking or just really want an AIO liquid cooler for aesthetic reasons, this air cooler is all you need.
1080p vs 1440p: What Can This Build Actually Do?
This is the question everyone wants answered, so let me be direct about the performance expectations for this gaming PC under $1,200:
At 1080p (1920×1080)
- Cyberpunk 2077 (RT Overdrive, DLSS Quality): 60-75 FPS
- Call of Duty (2025 title, max settings): 100-130 FPS
- Baldur’s Gate 3 (Ultra): 80-100 FPS
- Fortnite (Competitive settings): 200+ FPS
- Starfield (High-Ultra, DLSS): 60-80 FPS
At 1080p, this build is overkill for most games. You’ll be maxing out settings across the board and enjoying buttery-smooth framerates. If you’re pairing this with a 1080p 165Hz monitor, you’ll be pushing that refresh rate in most competitive titles.
At 1440p (2560×1440)
- Cyberpunk 2077 (RT Medium, DLSS Quality): 50-65 FPS
- Call of Duty (2025 title, high settings): 80-100 FPS
- Baldur’s Gate 3 (High-Ultra): 55-70 FPS
- Fortnite (Competitive settings): 144+ FPS
- Starfield (Medium-High, DLSS): 50-65 FPS
At 1440p, this build is very capable but not dominant. You may need to dial back some settings in the most demanding titles, especially with ray tracing enabled. DLSS is your best friend here — it effectively bridges the gap between native 1440p rendering and playable framerates. I’d call this build a confident 1440p machine for the next couple of years, especially as DLSS and FSR continue to improve.
Tips for First-Time Builders
If this is your first gaming PC build, welcome to the hobby. It’s genuinely one of the most rewarding things you can do in tech. Here are the lessons I’ve learned the hard way so you don’t have to.
1. Read the Motherboard Manual
I know, nobody reads manuals. Read this one. Specifically the sections on front-panel header connections, fan headers, and M.2 slot locations. Ten minutes with the manual will save you an hour of confused cable-tracing later.
2. Thermal Paste Application
The internet has turned thermal paste application into a religious debate. Here’s the truth: a small pea-sized dot in the center of the CPU works perfectly fine. The mounting pressure of your cooler will spread it evenly. Don’t do an X pattern, don’t spread it manually with a credit card, don’t use the whole tube. A pea-sized dot. Done.
If your cooler comes with pre-applied thermal paste on the contact plate, just use that. It’s fine. Really.
3. Cable Management Matters (But Not for the Reason You Think)
Neat cables don’t meaningfully improve thermals — that’s mostly a myth unless you have cables literally blocking a fan. The real reason to manage your cables is future maintenance. When you need to swap a drive, add RAM (see our budget gaming monitors), or reseat a GPU in two years, you’ll thank yourself for routing cables neatly behind the motherboard tray instead of creating a rat’s nest in the main compartment.
Tips that actually help:
- Route cables behind the motherboard tray through the rubber grommets
- Connect all power cables to the PSU before installing it in the case (if modular)
- Use the velcro ties or zip ties that come with your case
- Don’t plug in the front panel connectors until everything else is done — they’re the fiddliest part
4. POST Troubleshooting: Don’t Panic
Your first boot is nerve-wracking. You press the power button and… nothing happens. Or a fan spins for a second and stops. Before you spiral, here’s the checklist that solves 90% of first-boot failures:
- Check the front panel power button header. It’s almost always this. The tiny connectors are easy to misplace by one pin. Consult the motherboard manual.
- Reseat the RAM. Push those sticks in until both clips click. DDR5 requires more force than you’d expect. If you have two sticks, make sure they’re in the correct dual-channel slots (usually A2 and B2, not A1 and B1).
- Check the CPU power cable. The 8-pin EPS connector near the top of the motherboard is easy to forget. Your board won’t POST without it.
- Check the GPU power cable. Make sure the PCIe power cable from the PSU is fully seated in the graphics card.
- Look at the motherboard debug LEDs. Most modern B650 boards have four diagnostic LEDs (CPU, DRAM, VGA, BOOT) that tell you exactly what’s failing.
- Try one RAM stick. If you’re getting DRAM errors, try booting with a single stick in different slots to rule out a dead module or slot.
If you’ve gone through all of that and still can’t POST, it’s time to breadboard — take the motherboard out of the case and test it on the box it came in with just the CPU, one RAM stick, and GPU connected. This rules out any short circuits from the case.
5. Install Your I/O Shield First
Just trust me on this one. Install the I/O shield before the motherboard goes in. If you forget, you’ll be uninstalling the motherboard to put it in later. Ask me how I know.
Jiminy’s Final Verdict
This mid-range gaming PC build at roughly $1,130 is, in my opinion, the best-balanced system you can put together in November 2025. The Ryzen 7 7700X and RTX 4060 Ti combination delivers excellent 1080p performance and very solid 1440p gaming, with modern features like DLSS 3, PCIe Gen 4, and DDR5 that will keep this system relevant well into 2027 and beyond.
Could you spend less? Absolutely — drop to an RTX 4060 and a Ryzen 5 7600X and you’ll save about $120 while still having a very capable 1080p machine. Could you spend more? Sure — an RX 7800 XT or RTX 4070 would give you a more comfortable 1440p experience. But at the $1,100-$1,200 mark, I think this build hits the best bang for your buck in the current market.
Building your own PC is still one of the most satisfying things you can do as a gamer. There’s something deeply gratifying about pressing that power button for the first time and watching your creation come to life. Take your time, follow the manual, don’t force anything that doesn’t want to fit, and you’ll be gaming on your custom rig by the end of the weekend.
Happy building.
— Jiminy Whitlock