Camp Cooking on the Trail: Gear, Recipes, and Tips for Outdoor Meals
I will be the first to admit it: my early camp cooking attempts were embarrassing. I am talking burnt hot dogs on a stick, lukewarm canned beans, and instant coffee that tasted like it was brewed in a tire. But here is the thing — once I started taking camp cooking seriously, my entire overlanding experience leveled up. A hot, well-made meal at the end of a long day on the trail is not just food. It is a morale booster, a ritual (see our overlanding setup guide) (see our trail mapping and GPS apps), and honestly one of the best parts of being out there. If you have been surviving on granola bars and gas station jerky during your trips, this post is for you.
I have spent the last several years dialing in my trail kitchen setup, testing camp stoves in the rain, figuring out what actually keeps food cold for five days, and perfecting a handful of recipes that are genuinely delicious and dead simple to make at camp. I am going to walk you through everything — from cooking gear and food storage to actual recipes you can make tonight on your next trip. Let us get into it.
Camp Cooking Setup Options: Picking Your Heat Source
Before you worry about recipes, you need to figure out how you are going to cook. Your heat source is the foundation of your outdoor cooking gear setup (see our essential recovery gear), and the right choice depends on where you camp, how long you stay out, and how much effort you want to put into meal prep. I have used all three of the options below extensively, and each one has a place in my rotation.
Propane Camp Stove
This is where most people should start, and honestly, where most people will stay. A good two-burner propane camp stove is the closest thing to cooking on your stove at home. You get adjustable flame, instant ignition, and consistent heat that does not care about wind (if you have a decent windscreen). I run a Camp Chef Everest 2X as my primary camp stove, and it has been an absolute workhorse. The 20,000 BTU burners boil water fast, simmer sauces without scorching, and fold up compact enough to fit in my Jeep’s cargo area without taking up too much real estate.
For solo trips or ultralight setups, a single-burner stove like the Jetboil Genesis or an MSR PocketRocket works great. You are limited to one pot at a time, but if your camp meal ideas revolve around one-pot dishes (which mine often do), that is all you need. A standard one-pound propane canister will give you about 1.5 to 2 hours of cook time, so for a weekend trip, two canisters is plenty. For longer overlanding trips, I carry an adapter hose that connects to a five-pound refillable propane tank — way more economical and less wasteful.
Wood Fire Cooking
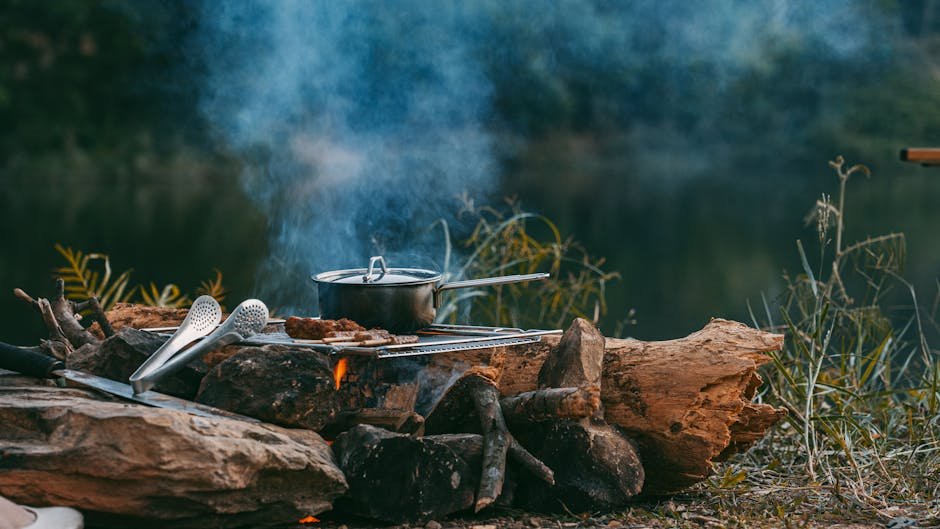
There is something primal and deeply satisfying about cooking over a wood fire. The flavor you get from open flame and wood smoke cannot be replicated by any camp stove. That said, wood fire cooking is slower, less predictable, and requires more skill and attention. You need to build your fire, let it burn down to coals (cooking over flames is a rookie mistake — coals give you even, manageable heat), and manage your temperature by adjusting the distance between your cookware and the coals.
I use a fire grate or a tripod grill setup when I am cooking over wood. A cast iron skillet or Dutch oven over a good coal bed is one of the best ways to cook outdoors, period. Just keep in mind that fire restrictions are increasingly common, especially in the western states during dry months. Always check local fire regulations before you plan on wood fire cooking, and have your propane stove as a backup. I have been shut out of campfires on more than a few trips and was very glad I had my Camp Chef along.
Portable Grill
A portable grill sits somewhere between a camp stove and a wood fire. You get that grilled flavor with more control than an open fire. I keep a small charcoal grill — the Weber Smokey Joe is a classic — for trips where I know I want to grill steaks, burgers (see our winter Jeep maintenance), or vegetables. Some overlanders swear by the Nomad Grill, which is pricier but folds flat and is built like a tank. For propane convenience with grill flavor, the Weber Traveler Q is a solid pick that sets up in seconds.
My honest recommendation? Start with a good two-burner propane camp stove. It is the most versatile, most reliable, and easiest-to-learn option for camp cooking. Add a portable grill or fire cooking skills later once you have the basics dialed in.
Essential Cookware for the Trail Kitchen
You do not need to bring your entire kitchen. In fact, one of the biggest mistakes I see new overlanders make is packing way too much cookware. Here is what I actually bring on every trip, and nothing more.
- 10-inch cast iron skillet — This is the single most important piece of outdoor cooking gear I own. It works on every heat source, retains heat like nothing else, and gets better with age. I use a Lodge skillet that I have been seasoning for years. It is nonstick at this point and practically indestructible.
- Dutch oven (5-quart) — For stews, chili, baking bread, and even desserts. If you cook over coals, a Dutch oven with legs and a flanged lid is essential. You can stack coals on top for even, oven-like heat.
- Medium stainless steel pot (3-quart) — For boiling water, making pasta, soups, and heating sauces. Stainless cleans up easier than cast iron when you are working with limited water.
- Spatula, tongs, and a sturdy wooden spoon — Keep it simple. Metal tongs are versatile for everything from flipping meat to adjusting coals.
- Sharp knife and a small cutting board — I carry a fixed-blade kitchen knife in a sheath and a flexible plastic cutting board that rolls up. Do not try to prep food with your pocket knife. Just don’t.
- Plates, bowls, and mugs — Enamelware is my pick. It is lightweight, nearly indestructible, and looks great. I use the GSI Outdoors Pioneer set.
- Collapsible wash basin and biodegradable soap — Cleanup is part of cooking. A two-basin system (wash and rinse) makes dishwashing at camp efficient and responsible.
Everything fits in a single plastic bin that slides into the back of my Jeep. I have labeled it, and it stays packed and ready to go between trips. That is a huge time saver when you decide on a Wednesday night that you are heading out Friday.
Food Storage: Coolers vs. 12V Fridges
This is one of the most important decisions in your camp cooking setup, and it comes down to trip length and budget. Let me break down both options honestly.
Traditional Coolers
A high-quality rotomolded cooler (think Yeti Tundra, RTIC Hard Cooler, or Pelican Elite) will keep food cold for three to five days if you manage your ice properly. The trick is pre-chilling the cooler the night before, using block ice instead of cubed (it lasts way longer), and minimizing how often you open the lid. I also freeze as much of my food as possible before packing it — frozen meat acts as additional ice packs and thaws slowly over the first day or two.
The downside of coolers is obvious: ice melts. After day three or four, you are dealing with a cooler full of cold water and food that is questionably safe. For weekend trips, a good cooler is perfect. For anything longer, you either need to resupply ice or upgrade to a 12V fridge.
12V Overlanding Fridge
A 12V fridge changed my overlanding cooking game completely. I run a Dometic CFX3 45 that sits in the back of my Jeep, and it keeps food at a consistent 37 degrees Fahrenheit no matter how hot it is outside. No ice to buy, no water to drain, no guessing if your chicken is still safe to eat. You set the temperature and forget about it. Some models even have a separate freezer compartment, which means you can keep ice cream at camp. I am not kidding. Ice cream on the trail is a legitimate morale booster.
The catch? Cost. A quality 12V fridge runs between $700 and $1,200 depending on size and brand. You also need a way to power it — a dual-battery system or a portable power station like the EcoFlow Delta is the way to go. But if you do multi-day overlanding trips regularly, a 12V fridge is one of the best investments you will make. I would put it right behind a good suspension and tires on the priority list.
Trail Recipes: 6 Easy Camp Meals That Actually Taste Good
Alright, this is the part you have been waiting for. These are my go-to trail recipes — tested over dozens of trips, refined for simplicity, and genuinely delicious. Every one of these can be made on a two-burner camp stove or over a fire. I am giving you real camp meal ideas, not that freeze-dried stuff that tastes like cardboard.
1. Campfire Breakfast Skillet
This is my most-cooked camp meal. It is fast, filling, and uses ingredients that keep well in a cooler or fridge.
Ingredients:
- 4 strips of bacon
- 1 pound breakfast sausage (or pre-cooked sausage links, sliced)
- 4 eggs
- 2 medium potatoes, diced small (or a bag of frozen hash browns)
- 1 bell pepper, diced
- 1 small onion, diced
- Shredded cheese
- Salt, pepper, garlic powder
Steps:
- Cook bacon in your cast iron skillet over medium heat. Remove bacon and set aside, but leave the grease in the pan.
- Add diced potatoes (or hash browns) to the bacon grease. Cook for 8 to 10 minutes, stirring occasionally, until golden and crispy.
- Add sausage, onion, and bell pepper. Cook for another 5 minutes until the sausage is browned and veggies are soft.
- Make four small wells in the mixture and crack an egg into each one. Cover the skillet with a lid or aluminum foil and cook for 3 to 4 minutes until the egg whites are set.
- Crumble bacon on top, add shredded cheese, and season with salt, pepper, and garlic powder. Serve straight from the skillet.
2. One-Pot Trail Chili
This is the ultimate cold-weather camp meal. I make this every single fall and winter trip without exception.
Ingredients:
- 1 pound ground beef
- 1 can (15 oz) kidney beans, drained
- 1 can (15 oz) black beans, drained
- 1 can (14 oz) diced tomatoes
- 1 can (8 oz) tomato sauce
- 1 small onion, diced
- 2 tablespoons chili powder
- 1 teaspoon cumin
- Salt and pepper to taste
- Optional toppings: shredded cheese, sour cream, tortilla chips
Steps:
- Brown the ground beef in your pot over medium-high heat. Drain excess fat if needed.
- Add onion and cook for 2 to 3 minutes until softened.
- Add chili powder and cumin. Stir for 30 seconds to toast the spices.
- Add kidney beans, black beans, diced tomatoes, and tomato sauce. Stir to combine.
- Bring to a simmer, then reduce heat to low. Let it cook for 20 to 30 minutes, stirring occasionally. The longer it simmers, the better it gets.
- Serve in bowls with cheese, sour cream, and crushed tortilla chips on top.
3. Foil Packet Fajitas
Foil packets are the unsung hero of camp cooking. Minimal cleanup, easy prep, and you can customize each one for picky eaters.
Ingredients (per packet):
- 1 chicken breast, sliced into strips (or use pre-sliced fajita meat)
- 1 bell pepper, sliced
- Half an onion, sliced
- 1 tablespoon olive oil
- 1 tablespoon fajita seasoning
- Flour tortillas, salsa, cheese, and sour cream for serving
Steps:
- Lay out a large sheet of heavy-duty aluminum foil. Place chicken strips, peppers, and onions in the center.
- Drizzle with olive oil and sprinkle fajita seasoning over everything. Toss to coat.
- Fold the foil into a sealed packet, leaving a little room inside for steam.
- Place the packet on a grill grate over coals or on your camp stove over medium heat. Cook for 15 to 20 minutes, flipping once halfway through.
- Carefully open the packet (watch out for steam), and serve the contents in warm tortillas with your toppings.
4. Camp Stove Quesadillas
This is my go-to quick lunch on the trail. It takes five minutes and uses stuff you probably already have packed.
Ingredients:
- Large flour tortillas
- Shredded cheese (a Mexican blend works great)
- Pre-cooked chicken or canned chicken, shredded
- Canned green chiles (small can)
- Butter or oil for the skillet
- Salsa for dipping
Steps:
- Heat your skillet over medium heat and add a small amount of butter.
- Place a tortilla in the skillet. Add a generous layer of cheese on one half, then top with chicken and green chiles.
- Fold the tortilla in half and press gently with your spatula.
- Cook for 2 to 3 minutes per side until the tortilla is golden and the cheese is melted.
- Slice into wedges and serve with salsa. Make multiple rounds because everyone will want seconds.
5. Dutch Oven Mac and Cheese
Forget the boxed stuff. This is creamy, rich, real mac and cheese made in a Dutch oven, and it is absurdly easy.
Ingredients:
- 1 pound elbow macaroni
- 3 cups shredded sharp cheddar cheese
- 1 can (12 oz) evaporated milk
- 2 tablespoons butter
- 1 teaspoon mustard powder
- Salt and pepper to taste
- Optional: crumbled bacon, diced jalapenos, or hot sauce
Steps:
- Boil the macaroni in your Dutch oven (or a separate pot) according to package directions. Drain and set aside.
- In the Dutch oven, melt butter over low heat. Add evaporated milk and mustard powder, stirring to combine.
- Add shredded cheese a handful at a time, stirring constantly until melted and smooth.
- Add the cooked pasta back in and stir until everything is coated in the cheese sauce.
- Season with salt and pepper, and add your optional toppings. Serve immediately while it is hot and gooey.
6. Campfire Banana Boats
You need a dessert, and this one has been a camp favorite since I was a kid. It takes five minutes and tastes incredible.
Ingredients (per banana):
- 1 banana, unpeeled
- Handful of chocolate chips
- Handful of mini marshmallows
- Optional: peanut butter, caramel sauce, crushed graham crackers
Steps:
- Slice the banana lengthwise through the peel on one side, but do not cut all the way through.
- Open the slit and stuff with chocolate chips and marshmallows.
- Wrap the banana in aluminum foil and place on a grill grate over coals, or on your camp stove over low heat.
- Cook for 5 to 7 minutes until the chocolate and marshmallows are melted.
- Unwrap carefully, add optional toppings, and eat with a spoon straight from the peel.
Water Purification: Don’t Skip This
If you are cooking on the trail, you need water — for drinking, cooking, and cleaning. And unless you want to carry every drop with you (which limits trip length fast), you need a way to purify water from natural sources. This is one area where I do not cut corners.
I carry a Sawyer Squeeze filter as my primary water purification tool. It filters down to 0.1 microns, which removes bacteria and protozoa. It is lightweight, affordable, and I can filter a liter in about 30 seconds by squeezing it through the bag. For larger volumes (like filling up a five-gallon jug for camp cooking), I use a Platypus GravityWorks 4L system. You hang it from a tree, connect the hose, and gravity does the work while you set up camp. It is hands-free and perfect for groups.
For situations where viruses might be a concern (international travel or questionable water sources), I add Aquamira water treatment drops as a chemical backup. The filter handles bacteria and protozoa, and the chemical treatment handles viruses. Belt and suspenders. I also always boil water that I am using for cooking — a rolling boil for one minute at lower elevations, three minutes above 6,500 feet. Between filtering and boiling, your cooking water is safe.
One more tip: always carry more water than you think you need. I bring at least one gallon per person per day as a baseline, plus extra for cooking and cleaning. A seven-gallon rigid water container lives permanently in my Jeep. It has saved me on more than one trip when a planned water source was dry.
Leave No Trace Cooking Tips
Camp cooking generates waste — food scraps, grease, dirty water, packaging — and how you handle it matters. I take Leave No Trace principles seriously because the places I love to camp will only stay beautiful if we all do our part. Here is how I handle it.
- Pack out all food waste. Apple cores, eggshells, banana peels — all of it. “Biodegradable” does not mean it disappears overnight. Food scraps attract wildlife and take months or years to decompose. I keep a dedicated trash bag just for food waste and it leaves with me.
- Strain and pack out gray water. When I wash dishes, I strain the dirty water through a fine mesh strainer to catch food particles. Those particles go in the trash bag. The strained gray water gets scattered broadly at least 200 feet from any water source. I use biodegradable soap (Campsuds or Dr. Bronner’s) for all camp dishwashing.
- Manage grease properly. Bacon grease and cooking oil should never be dumped on the ground. I pour used grease into an empty can or a sealed container and pack it out. Some people pour grease into a ziplock bag with paper towels to solidify it, which also works well.
- Minimize packaging before you leave home. Repackage food into reusable containers or ziplock bags before your trip. Less packaging at camp means less trash to manage and less space wasted in your cooler or fridge.
- Keep a clean camp to avoid wildlife encounters. Store food in your vehicle or in a bear canister when required. Never leave food out unattended. A clean camp is a safe camp — for you and for the animals.
- Use fire responsibly. If you cook over a wood fire, use an existing fire ring when possible. Burn wood completely to ash, make sure your fire is dead out before you leave, and scatter the cold ashes. If you packed in a fire pan, pack it out too.
Jake’s Personal Camp Kitchen Setup
People always ask me what my exact setup looks like, so here it is — the camp kitchen that lives in my Jeep and has been refined over years of trial and error. This is what I actually use in March 2026, and I have no plans to change anything major anytime soon.
Cooking Gear
- Camp Chef Everest 2X two-burner stove (primary stove)
- MSR PocketRocket Deluxe (backup and quick-boil stove)
- Weber Smokey Joe portable charcoal grill (for steak nights)
- Lodge 10-inch cast iron skillet
- Lodge 5-quart camp Dutch oven
- GSI Outdoors Glacier stainless steel 3-quart pot
- GSI Outdoors Pioneer enamelware plate/bowl/mug set (service for four)
Food Storage and Prep
- Dometic CFX3 45 12V fridge (powered by a Renogy 200Ah lithium battery with a battery-to-battery charger)
- RTIC 45 Hard Cooler (backup cooler for drinks and overflow)
- 7-gallon Scepter rigid water container
- Sawyer Squeeze water filter and Platypus GravityWorks 4L system
- Collapsible cutting board and a Victorinox 8-inch chef’s knife in a blade guard
Organization and Cleanup
- Plano 56-quart sportsman trunk (all cookware stored in one bin)
- Collapsible dual-basin wash station
- Campsuds biodegradable soap
- Quick-dry microfiber dish towels
- A small spice kit (salt, pepper, garlic powder, chili powder, cumin, paprika, Italian seasoning) stored in small labeled containers inside a ziplock bag
The entire kitchen setup fits into about three cubic feet of cargo space. The fridge sits on a slide in the back of my JKU, the cooler goes next to it, the cookware bin stacks on top, and the stove and grill fit in the remaining space. It is organized, repeatable, and I can go from parked to cooking in about ten minutes. That system did not happen overnight — it is the result of many trips where things did not fit, got lost, or broke. Take the time to figure out what works in your specific vehicle and for your style of camping.
Final Thoughts on Camp Cooking
Camp cooking does not have to be complicated, and it definitely does not have to mean eating bad food. With the right outdoor cooking gear, a handful of reliable trail recipes, and a system that keeps your ingredients fresh and your camp clean, you can eat better on the trail than a lot of people eat at home. I genuinely believe that food is one of the things that turns a good trip into a great one.
Start simple. Pick up a decent camp stove and a cast iron skillet, try the breakfast skillet recipe on your next trip, and build from there. Before you know it, you will be the person at camp that everyone wants to sit next to when the stove fires up. And honestly? That is a pretty great reputation to have.
If you have a favorite camp meal or a piece of overlanding cooking gear you swear by, drop it in the comments. I am always looking for new camp meal ideas to try. See you on the trail.
Leave a Reply