Why I Finally Ditched My Ground Tent
I spent seven years setting up ground tents on rocks, roots, and whatever patch of almost-level dirt I could find at the end of a long trail day. Then I strapped a roof top tent onto my Jeep, and I haven’t touched a ground tent since. If you’re curious whether an RTT is worth the money—and whether it’ll work for your rig and your style of overlanding—this guide covers everything I wish I’d known before buying.
Roof top tents have exploded in popularity over the last few years, and for good reason. The overlanding scene has matured enough that there’s now a legitimate market with dozens of solid brands, two very different design philosophies (soft shell vs. hard shell), and price points ranging from under $500 to well over $3,000. Picking the right one requires understanding your vehicle, your camping style, and what tradeoffs you’re genuinely okay living with on the trail.
Before we get into it, if you’re still building out your overland rig from the ground up, check out my Overlanding 101 guide for the full picture on setting up a Jeep for multi-day adventures. The RTT is one piece of the puzzle.
Soft Shell vs. Hard Shell: The Big Decision
Every RTT conversation starts here, and for good reason—this choice affects your wallet, your roof load, your setup time, and how the tent performs in bad weather.
Soft Shell Roof Top Tents
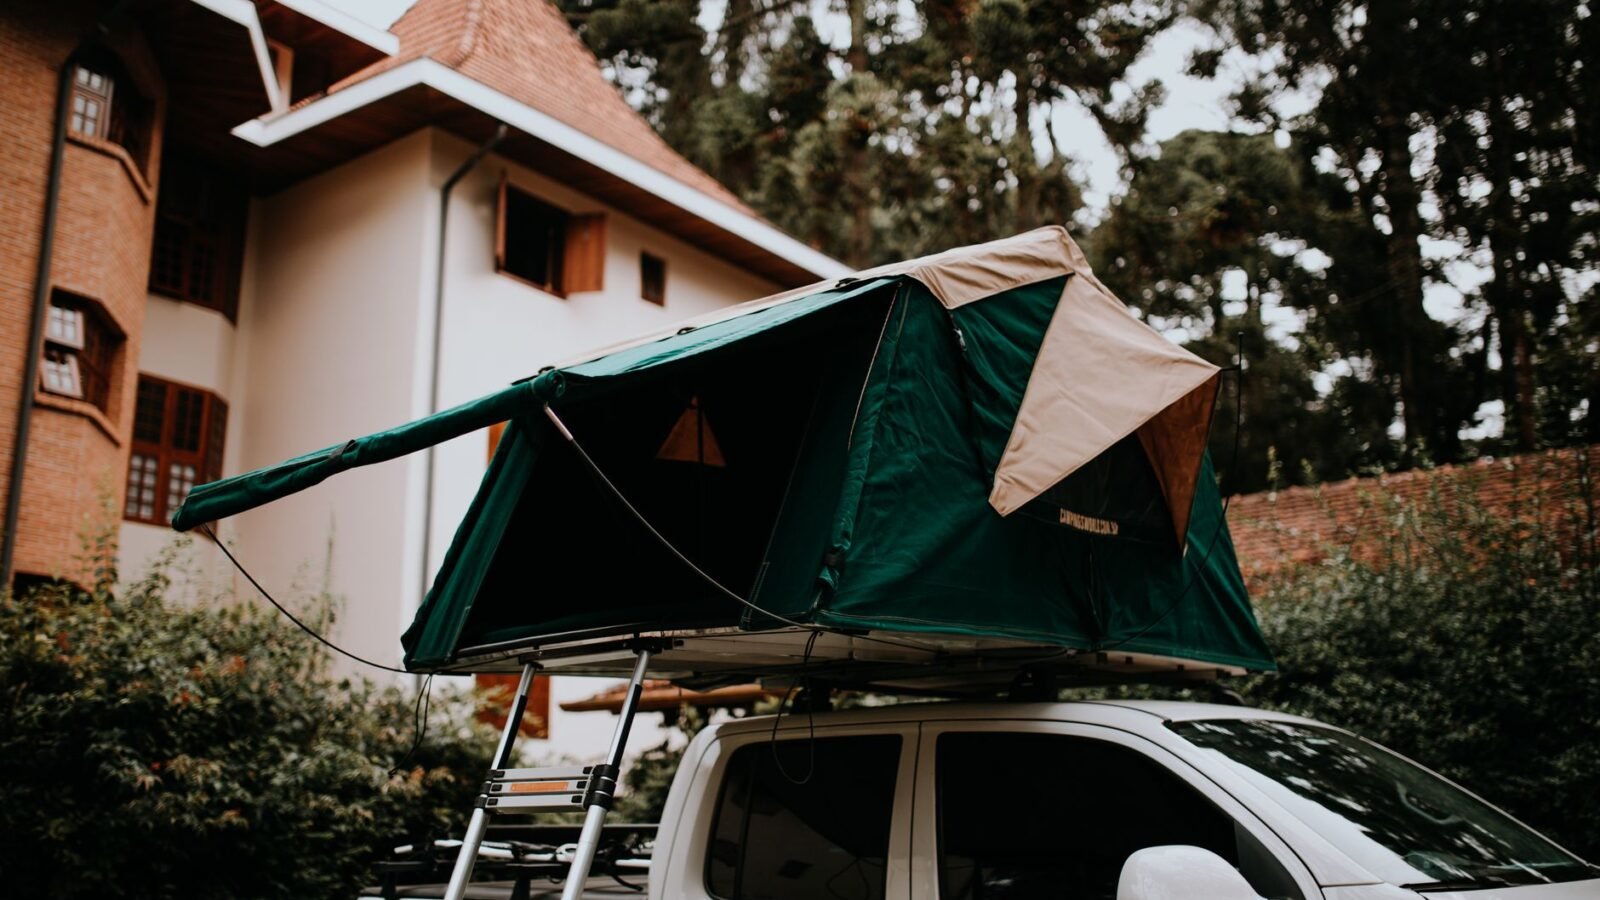
Soft shell RTTs are the classic design. They fold flat on your roof, often with the mattress and bedding stored inside, and you open them by unfolding a hinged frame covered in canvas or ripstop nylon. Most unfold at a 45–60 degree angle from one side, supported by a set of folding arms or a scissor mechanism.
Pros:
- Lower cost — quality soft shells start around $600–$900, and budget options exist under $500
- More sleeping room — many models sleep two adults comfortably, with some three-person options available
- Better ventilation in hot weather — canvas breathes, mesh windows are common
- Annex rooms attach more easily to the extended ladder and awning bracket
Cons:
- Setup takes longer — typically 3–5 minutes to fully open and tension, 5–10 minutes to pack down properly
- Wet canvas is miserable to pack — if you’re breaking camp in rain, you’re stuffing wet fabric into the shell
- Higher drag profile on the highway — the folded shape is usually taller and less aerodynamic
- Bedding stays in the tent when closed, but pillows and loose items can shift and bunch
For weekend warriors who aren’t obsessing over pack time, a soft shell is often the better value. The extra interior space is genuinely nice.
Hard Shell Roof Top Tents
Hard shell RTTs use a rigid outer shell—aluminum, fiberglass, or ABS—that pops up (either clamshell or flip-up) to reveal a tent inside. The Gen 2 designs from brands like iKamper, Roofnest, and James Baroud have become genuinely impressive pieces of gear.
Pros:
- 30–60 second setup — lift the latches, pop the shell, and you’re done. This is not an exaggeration.
- Better aerodynamics — the smooth shell cuts through air better than a folded canvas brick
- Weather resistance — the hard outer shell handles rain and snow better; you can pack up wet without soaking fabric
- Cleaner look on the vehicle when closed
Cons:
- Expensive — expect $1,800–$3,500+ for a quality hard shell
- Heavier — typically 130–200 lbs vs. 90–140 lbs for soft shells
- Smaller interior — the rigid shell limits footprint; most sleep two adults but it’s cozy
- Harder to attach an annex room without a purpose-built kit
If you camp regularly and hate fussing with setup, or if you do a lot of shoulder-season camping in unpredictable weather, the hard shell’s speed and weather resistance justify the price premium. For me, switching to a hard shell was the single biggest quality-of-life upgrade I’ve made to my overland setup.
Know Your Roof Load Rating — This Is Non-Negotiable
Before you buy any RTT, you need to know your vehicle’s dynamic and static roof load ratings. This is the part most people skip and then regret.
- Static load rating: how much weight your roof can support when the vehicle is stationary. Most crossbars and rack systems rate for 150–250 lbs static.
- Dynamic load rating: how much weight can ride on the roof while driving. This is almost always much lower—commonly 75–165 lbs depending on the rack and vehicle.
Your RTT + its occupants when closed (the tent collapses down, but the mattress and hardware still weigh the same) needs to stay within dynamic rating. A 100 lb soft shell tent is right at the limit for many factory crossbars. Most serious overlanders run an aftermarket roof rack—ARB, Prinsu, Rhino-Rack, or Front Runner—specifically because the dynamic ratings are significantly higher (often 330–660 lbs).
On a Jeep Wrangler JL, for example, the factory hard top has a 150 lb dynamic load rating. A mid-range hard shell RTT sits right at or above that. An aftermarket rack like the Prinsu Full Roof Rack bumps you to 350 lbs dynamic and gives you a solid crossbar mounting platform.
Don’t cheap out on the mounting hardware. Torque your crossbar bolts to spec, check them after the first hundred miles, and check them again seasonally. A tent departing a roof at highway speed is not a hypothetical problem.
Key Specs to Evaluate
Mattress Thickness and Density
The built-in mattress is one of the biggest differentiators between budget and premium RTTs. Budget tents come with 2–2.5 inch high-density foam that’s serviceable but not luxurious. Mid-range tents step up to 3-inch foam. Premium options like Rooftop Tents and iKamper use 4-inch high-density foam or hybrid foam/memory foam combos that genuinely rival home beds. If you’re doing more than a night or two at a time, mattress quality matters a lot.
Fabric Weight and Rating
Look for 280–320 GSM poly-cotton canvas or ripstop nylon for the tent body. Heavy canvas handles abrasion and weather better but adds weight and takes longer to dry. Nylon is lighter but can feel stuffy in hot weather. Check the waterproof rating—2,000mm hydrostatic head is the minimum for rainy conditions; 3,000–5,000mm is better for extended exposure.
Windows and Ventilation
A well-designed RTT has at least two windows with no-see-um mesh and rain fly coverage. Condensation is real when two people are sleeping in an enclosed space, so cross-ventilation matters. Some hard shell designs include roof vents with covers; those are worth paying for in warm climates.
Ladder Length and Angle
The ladder needs to reach the ground at a comfortable angle for your specific roof height. Most come with adjustable-length ladders, but double-check that the adjustment range covers your rig. On a lifted Wrangler with a roof rack, you might be at 7+ feet—make sure the ladder handles that. Wider, anti-slip rungs are noticeably more comfortable at 2am in the dark.
Brands Worth Looking at in 2026
The RTT market has shaken out considerably since the early days of cheap knockoffs. Here are the brands I’d actually recommend investigating:
iKamper
iKamper’s Skycamp series remains one of the most polished hard shells on the market. The Skycamp Mini (for two) and full-size Skycamp open in about 10 seconds, sleep on an excellent high-density foam mattress, and pack down to a clean low-profile shell. They’re expensive ($2,800–$3,400) but justify it with build quality. The X-Cover series is worth a look if you want a canvas-exterior pop-up design with more weather versatility, and the X-Cover XL accommodates larger groups.
Roofnest
Colorado-based Roofnest makes a solid hard shell that’s slightly more affordable than iKamper. The Condor and Sparrow series are popular on Jeeps and 4Runners. Good warranty support and US-based customer service.
CVT (Cascadia Vehicle Tents)
CVT makes some of the best soft shells on the market. Their Mt. Shasta and Mt. Hood series are bomber, with excellent canvas quality and solid aluminum frames. If you want a proven soft shell at a fair price ($900–$1,400), CVT is the go-to.
Tepui (by Thule)
Tepui tents offer good value and wide availability through REI and other retailers. The Kukenam and Autana series cover the mid-range soft shell segment well. Being under the Thule umbrella means consistent quality control.
Budget Options
If budget is tight, brands like Tuff Stuff and Smittybilt offer soft shells in the $400–$700 range. They’re not as refined, but for occasional use, they’ll do the job. I’d be cautious going under $400—the hardware quality tends to drop sharply at that price point, and a tent failure on a remote trail is no fun.
Annex Rooms: Worth It?
An annex room attaches to the bottom of your open RTT, creating an enclosed ground-level space under the tent. They’re useful for gear storage out of the elements, changing clothes with privacy, or adding sleeping space for a third person. Most soft shell manufacturers sell purpose-built annexes; hard shell options are more limited.
The tradeoffs: setup complexity goes up significantly with an annex, and they add more fabric to manage when wet. For car camping or established campgrounds, an annex is a great addition. For technical trail camping where you might move camp multiple times, it can become a hassle. I bring mine on longer trips and leave it home for weekend runs.
On the Trail: Real-World Usage Notes
A few things you learn after a season of RTT camping that the spec sheets don’t tell you:
Wind is the enemy. A tent elevated 6 feet off the ground catches considerably more wind than a ground tent. In sustained 30+ mph wind, sleep gets difficult. Position your vehicle to use it as a windbreak when possible.
You can’t sleep in the tent while driving. Obvious, but worth saying. The tent has to be closed every time you move the vehicle. On multi-day trips where you stay at one camp, that’s no issue. On a point-to-point trip where you drive between camps, factor in that close-and-open time.
Ladder stability on soft ground. Hard-packed dirt or rock: fine. Deep sand or mud: your ladder can sink or shift. Bring a small piece of plywood or a folding pad to set under the ladder feet in soft conditions.
Heat retention is excellent, cold ventilation is tricky. The enclosed platform holds heat well, which is great in cool weather. In summer, you need airflow—make sure your tent design allows windows and vents to be open while still keeping bugs and condensation out.
Speaking of trail prep, having your tire pressure dialed in before you leave pavement makes a huge difference in how your rig handles with the added roof weight. My tire pressure and compressor guide walks through exactly how to figure out your target PSI for different terrain types.
Installing Your RTT: What to Expect
Most RTTs mount via crossbars with T-track or bolt-on hardware. The process is manageable with two people and basic hand tools, but the weight makes it a two-person job minimum. Getting a 150 lb hard shell onto roof crossbars solo is a good way to throw your back out.
Typical install steps:
- Mount and torque crossbars to your rack (follow rack manufacturer torque specs)
- With a helper, lift tent onto crossbars and align mounting brackets
- Thread T-track bolts or clamps and snug them hand-tight
- Verify position and check that the tent opens freely on both sides
- Torque mounting hardware to spec (usually 20–35 ft-lbs—check your tent’s manual)
- Do a test open and close before loading it with gear
Periodically re-check the mount hardware, especially after rough trails where vibration works things loose. I do a visual and touch check on mine every few trips.
Gearing Up Around the RTT
Once the tent is on, you’ll naturally start thinking about what else to add. The standard additions most RTT users end up with:
- Awning: A 270° or 180° awning mounted to the side of your rack creates covered outdoor living space. Front Runner, ARB, and Smittybilt all make solid options. The 270° designs that wrap around the side and rear are genuinely transformative for camp comfort.
- 12V power to the tent: Running a USB charger or small 12V socket to the tent platform via your aux battery is a small job with a big payoff—phone charging, a light, a fan in summer.
- Shoe/gear bag: Most RTT ladders have hooks or loops for attaching a small bag at the bottom. It keeps boots and trail tools off the ground and out of the tent.
And never head out without your recovery gear sorted. Getting stuck with an RTT on the roof isn’t the end of the world, but it does raise your center of gravity—which changes how your rig behaves if you need to winch out or use traction boards. Review your recovery gear checklist before any serious trail run.
Bottom Line: Is an RTT Worth It?
For anyone who overlands more than a handful of times a year, yes—the quality-of-life improvement is real. Sleeping off the ground, on a proper mattress, with no tent stakes or ground prep, is genuinely better than a ground tent in most situations. The tradeoffs (cost, roof load, highway fuel economy hit) are manageable once you understand them upfront.
My honest recommendations by use case:
- Weekend warrior on a budget: CVT Mt. Shasta or Tepui Kukenam soft shell. $900–$1,100, proven, available.
- Regular overlander who wants easy setup: iKamper Skycamp Mini or Roofnest Condor. Pay the premium once and stop fighting with your tent.
- Truck or SUV with a long bed or flat roof: Consider a hard shell in the smaller footprint sizes—they sit lower and drag less.
- Family camping with kids: A large soft shell (iKamper X-Cover XL, Thule Tepui Autana) that sleeps 3 is worth the extra size.
Take the time to verify your roof load ratings, buy a proper rack if your stock crossbars are borderline, and don’t cheap out on the mounting hardware. Do those three things and you’ll be sleeping well above the rocks by the end of next month.

Leave a Reply